Mr. Beer Brewing Instructions
Welcome to the world of Mr. Beer®. For over 25 years we have refined the process equipment, and expense than other methods. Our patented brewing system includes a compact, lightweight fermenter keg that is modeled after the design of professional brewing equipment. We also include a can of brewing extract - a concentrated form of all natural malted barley and hops - produced in a state-of-the-art facility by Coopers Brewery, the largest independent brewery in Australia.
There are over 100 different Mr. Beer® refills & recipes to choose from. They each produce about 1 case/2 gallons/22 servings of beer in about 4 weeks. Other than the waiting times for fermentation, carbonation and conditioning, it should only take about an hour of your time. If you have any questions along the way please feel free to contact us here or call us at 1-800-852-4263.
What's Included |
What You Need |
|
2 Gallon Keg Fermenter & Lid Spigot, Washer & Nut (11) 25 oz/740 mL Bottles,Caps & Labels(In Complete Kits Only.) Can of Brewing Extract Packet of Yeast(Under lid of Brewing Extract) Packet of No-Rinse Cleanser Bag of Carbonation Drops(In selected kits only) Set of Printed Instructions Registration Card |
Bottles & Caps (Starter Kits Only) for 256 oz / 8 litres of beer. View Bottles Here (2) Gallons of Refrigerated Water(For brewing extract) 1-Gallon Container(To mix cleaning solution during bottling) 4-Quart or Larger Pot Plastic Spoon/Whisk Can Opener Measuring Cup Large Mixing Bowl |
Step 1: Assembling the Spigot
1. Place washer on the spigot with the beveled washer is outside of the keg. Then screw on the nut inside the keg. Gently hand tighten but be careful to not over tighten.
2. Test the keg for leaks by filling it completely with water and letting it sit for 15-30 minutes.
If your keg does leak please contact us for a replacement
Step 2: Cleaning
Cleaning is one of the most important steps in brewing. It kills microscopic bacteria, wild yeast and molds that may cause off-flavors in your beer. Make certain to clean all equipment that comes in contact with your beer by following the directions below.
1. Fill clean keg with warm water to line mark 1 on the back, then add ½ pack (about 1 tablespoon) of No-Rinse Cleanser and stir until dissolved. Once dissolved, the solution is ready to use. Save the remaining ½ of No-Rinse Cleanser because you will need it for bottling.
2. Screw on lid and swirl the keg so that the cleaning solution makes contact with the entire interior of the keg, including the underside of the lid. Note that the ventilation notches under the lid may leak solution. Allow to sit for at least 2 minutes and swirl again.
3. Pour the rest of the solution from the keg into a large bowl. Place your spoon/whisk, can opener and measuring cup into the bowl to keep them clean throughout the brewing process. Leave them immersed for at least 2 minutes in cleaning solution prior to using.
4. After all surfaces have been thoroughly cleaned, do not rinse or dry the keg or utensils. Return lid to top of keg and proceed immediately to brewing.
Step 3: Brewing
There are four ingredients needed to produce beer. They are malted barley, hops, water and yeast. Mixing malted barley, hops and water produces what is called wort (pronounced wert). This can be messy, time consuming and difficult to control. Mr. Beer® simplifies the process with all-natural, hopped brewing extract that is produced by Master Brewers at Coopers Brewery. This ensures that you can consistently produce great tasting beer in a short amount of time.
It will take approximately 30 minutes to mix the brewing extract with water and add yeast. This will begin the fermentation process where the yeast breaks down the sugars to produce alcohol. Fermentation will be complete in about 10 - 14 days. Please follow the detailed instructions below.
1. Remove the yeast packet from under the lid of the can of brewing extract, then remove the label from the can. Place the unopened can in hot tap water.
2. Using a clean measuring cup, pour 4 cups of water into your 4-quart or larger pot. If Booster Packs are included, add them slowly while stirring the cool water until dissolved. Bring water to a boil, and then remove pot from heat.
3. Open the can of brewing extract from the bottom of the can and pour it into the pot. Stir until thoroughly mixed. This mixture is the wort.
4. Fill the keg with cold water to line mark 1 on the back. The water must be cold (ideally from the refrigerator) with a temperature of 40-55°F/4-12°C. For the best results, we recommend using bottled spring water or filtered tap water.
5. Pour the wort into the keg and then bring the volume of the keg up to line mark 2 by adding more cold water. Mix vigorously with the plastic spoon/ whisk. Be careful to not scratch the inside of the keg, which could create small spaces for bacteria to grow.
6. Sprinkle the entire yeast packet into the keg and then screw on the lid. Do not stir.
7. Allow the keg to sit for 10 - 14 days.
Store the keg in a cool, dark place between 68-78°F/20-26°C for the yeast to work properly. The ideal temperature range is 70-72°F/21-22°C. After a few days the foam and activity will subside and your batch will appear to be dormant. However, the yeast is still at work, slowly finishing the fermentation process. Allow the fermentation 10 - 14 days to ensure the process is complete.
WARNING: Do not open the keg lid at any time during the fermentation process because oxygen from the air can spoil the beer.
Step 4: Bottling
After 10 days, taste a small sample to determine if the beer is fully fermented and ready to bottle. If it tastes like flat beer, it is ready. If it’s sweet, then it’s not ready. Let it ferment for 4 more days (14 total). It is now time to bottle and add carbonation drops (carb drops). Do not let it sit in the fermenter for longer than 21 days total.
Bottles: Your kit may not include bottles and caps, but you have options. You will need enough bottles to hold a total volume of 256 ounces/8 liters. See all of our bottling options, here. We recommend our 12 pack of 25 oz./740 mL bottles. These bottles are great because they are large enough to reduce bottling time and small enough to equal 2 servings. They are compatible with the carbonation drops included with your kit. You might be interested in our bottling wand which makes bottling even easier, that can be found, here. You can also use other bottles and caps that are designed to hold carbonated beverages.
Carbonation: Your kit may include carb drops that will naturally carbonate beer in bottles. This causes the remaining yeast to metabolize into carbon dioxide (CO2).
Follow the directions below for bottling & carbonating with our 25 oz. / 740 mL. bottles.
1. Fill a 1-gallon container with warm water, add the remaining ½ pack of No-Rinse Cleanser and stir until dissolved. Use this to clean the bottles.
2. Distribute the cleaning solution equally among the bottles. Screw on caps and shake bottles vigorously. Allow to sit 2 minutes, then shake the bottles again. Remove caps and empty all cleaning solution into a large bowl. Use this solution to clean any other equipment you may be using for bottling. Do not rinse.
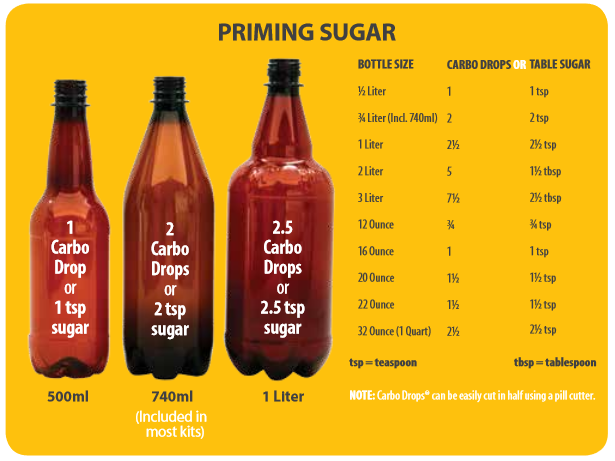
3. Add 2 carbonation drops to each 25 oz / 740 mL. bottle.
4. Fill each bottle at an angle with the spigot nozzle inside the bottle to prevent foaming and oxidation. Fill to 1 inch from the top. Then screw on caps tightly.
5. Note that different bottle sizes require a different ratio of carb drops. For example, 12 oz. bottles use ¾ of a drop and 16 oz. bottles use 1 drop. Pill cutters work great to cut the drops to the appropriate size.
Step 5: Carbonating & Conditioning
Make sure to keep out of direct sunlight. If the bottles are exposed to colder temperatures (below 70°F/21°C) they will take much longer to carbonate. If they are exposed to warmer temperatures (over 78°F/26°C) off-flavors may be produced. The ideal carbonation time is 14 days. The beer is now ready and should be refrigerated for 48 hours before drinking to stabilize the carbonation.
Congratulations. You made your own beer! Enjoy & share.
A Tip From Our Brewmasters
After the primary carbonation has taken place and your beer is ready to drink, we recommend putting a bottle in the refrigerator. After 48 hrs. give it a try and if you like it, refrigerate the rest. If it does not taste quite right, leave the bottles out at room temp for another week. Keep following this method until your brew tastes just how you like it. This process is called condi- tioning and during this time the yeast left in your beer can help clean up any off flavors. Almost everything gets a little better with time and so will your beer.
Step 6: Clean Again
To ensure your next batch of beer is as good as the first, you need to clean your equipment immediately after use. While rinsing is good, only soap and water will result in clean equipment for your next brew. The best cleaner to use is Oxygen Brewery Wash which is available, here. It effectively breaks down residue without leaving any flavor or foam-damaging particles after rinsing. You can also use liquid soap as long as it is unscented and is thoroughly rinsed off with warm water at 105-115°F/41-46°C. Scented soap or improper rinsing can leave a film on your equipment that will lead to off-flavors in your next beer.
1. Immediately after use, remove and disassemble the spigot assembly from the keg, then thoroughly wash all parts in warm water using a clean, soft cloth and Oxygen Brewery Wash or clear, unscented liquid soap. Then thoroughly rinse with water.
2. Do not use scouring pads, wire brushes, sponges or abrasives during cleaning because they can create small scratches that harbor bacteria. Bacteria is bad and will infect your beer.
3. Always clean and rinse all equipment, including bottles, immediately after use.
If you want to print out the instructions or view other brewing instructions use the links below. If you have any questions please fill out the information below and we will get back to you as quick as we can, Cheers!
Craft Beer Kit Instructions
|
2G BrewMax Instructions
|
5G BrewMax Instructions
|
General Information
|


